Different Ways to Mount a Projector on a Ceiling
Mounting a projector on a ceiling can be a daunting task. That is if you don’t know the different methods for doing so. Fortunately, there are several different ways to mount a projector to the ceiling that each have their own advantages and disadvantages. In this blog post, we’ll explore how to mount a projector to a ceiling. As well as the different methods available, and which one is best for you.
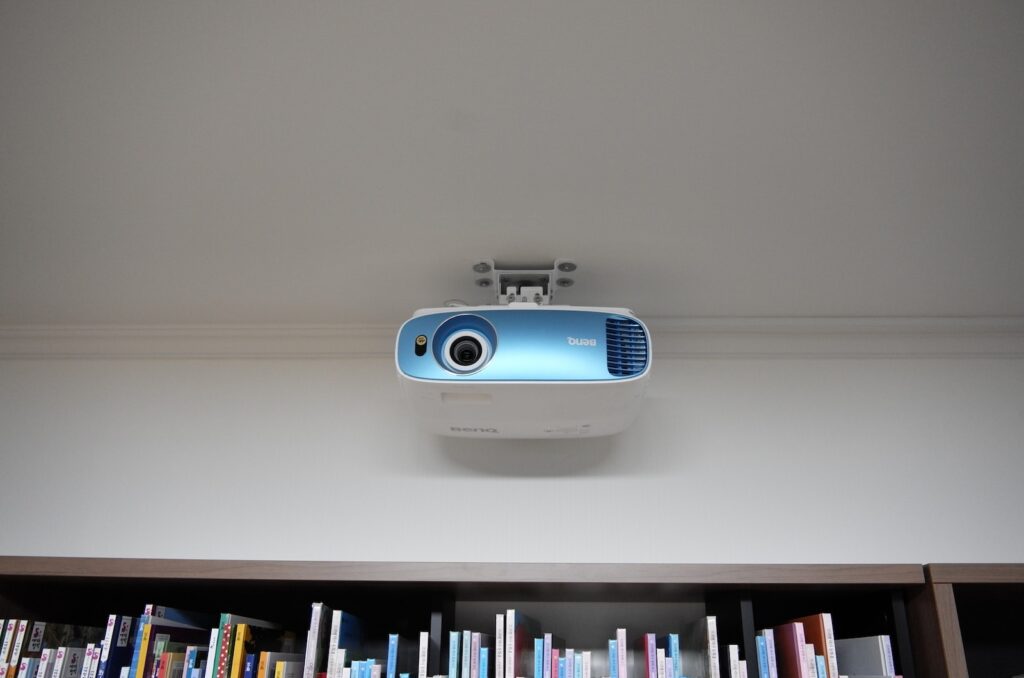
Projector Suspended From the Ceiling
When using this method, you should consider factors such as the weight of the projector; the height of the ceiling; the type of mounting hardware you will use; and the amount of vibration and noise that can be expected in the room. You will need tools such as a drill, screws, stud finder, level, tape measure. And possibly some help from an assistant.
The steps involved in this method are fairly straightforward. First, locate the studs in the ceiling using a stud finder and mark their locations. Then, install the mounting bracket onto the studs using screws.
Finally, hang the projector on the bracket with the appropriate hardware. This method has the benefit of being relatively easy to do and relatively inexpensive to purchase the necessary equipment.
The unique features of this method are that it allows you to easily adjust the height of the projector. It also gives you a better range of motion for aiming it. The main downside is that it can be difficult to secure the projector in place. That is, if there is too much vibration in the room.
Note that because the projector is suspended from the ceiling, it can create more noise than other methods.

In conclusion, Projector Suspended From the Ceiling is a great way to mount a projector to your ceiling. Especially, if you have limited space or height restrictions.
Just make sure to consider all factors before you begin. Use the correct tools and mounting hardware to ensure a secure and successful installation. With proper preparation, you can easily hang a projector from your ceiling in no time!
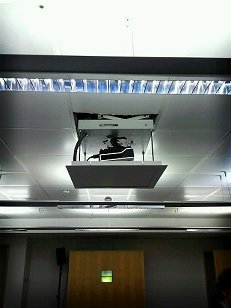
Projector Semi-Recessed Into the Ceiling
The Projector Semi-Recessed Into the Ceiling method is a great option for those looking to hang a projector from the ceiling without creating an eyesore. This method entails mounting a projector onto the ceiling in such a way that the projector itself is partially recessed into the ceiling. Leaving only the lens and necessary hardware visible.
When considering this method of mounting a projector on the ceiling, there are a few factors to keep in mind. You’ll need to ensure that you have enough space in your ceiling. To accommodate the projector as well as any necessary accessories.
You’ll also need to make sure that you can easily access the projector. In case you ever need to adjust or repair it. Additionally, you’ll need to make sure that the projector is properly ventilated so that it doesn’t overheat while in use.
To successfully mount a projector semi-recessed into the ceiling, you’ll need a few basic tools. Including a drill, screwdriver, level, and some screws.
To begin,
- measure and mark out the area where the projector will be placed.
- Next, drill holes for the screws and attach the projector using the appropriate screws.
- Then use a level to ensure that the projector is properly aligned with the ceiling.
- Finally, connect the necessary cables and secure them with cable clips.
One of the unique features of this method is that it allows for a professional-looking installation. Without having to invest in complex mountings or expensive brackets.
Furthermore, this method reduces the chance of overheating due to poor ventilation. As the projector is installed within the ceiling itself. Also, since the projector is tucked away within the ceiling, it eliminates any distraction or visual obstruction during movie screenings or presentations.
Some of the advantages of mounting a projector semi-recessed into the ceiling include improved heat dissipation, easy accessibility, and discreet installation. On the other hand, one of the major disadvantages of this method is that it requires more complicated installation procedures compared to other methods.
Moreover, additional tools may be needed if you don’t already have them at home.
Ultimately, mounting a projector semi-recessed into the ceiling can be a great option for those looking for a more professional and discreet installation.
However, it’s important to consider all of the factors mentioned above before deciding on which method to use.
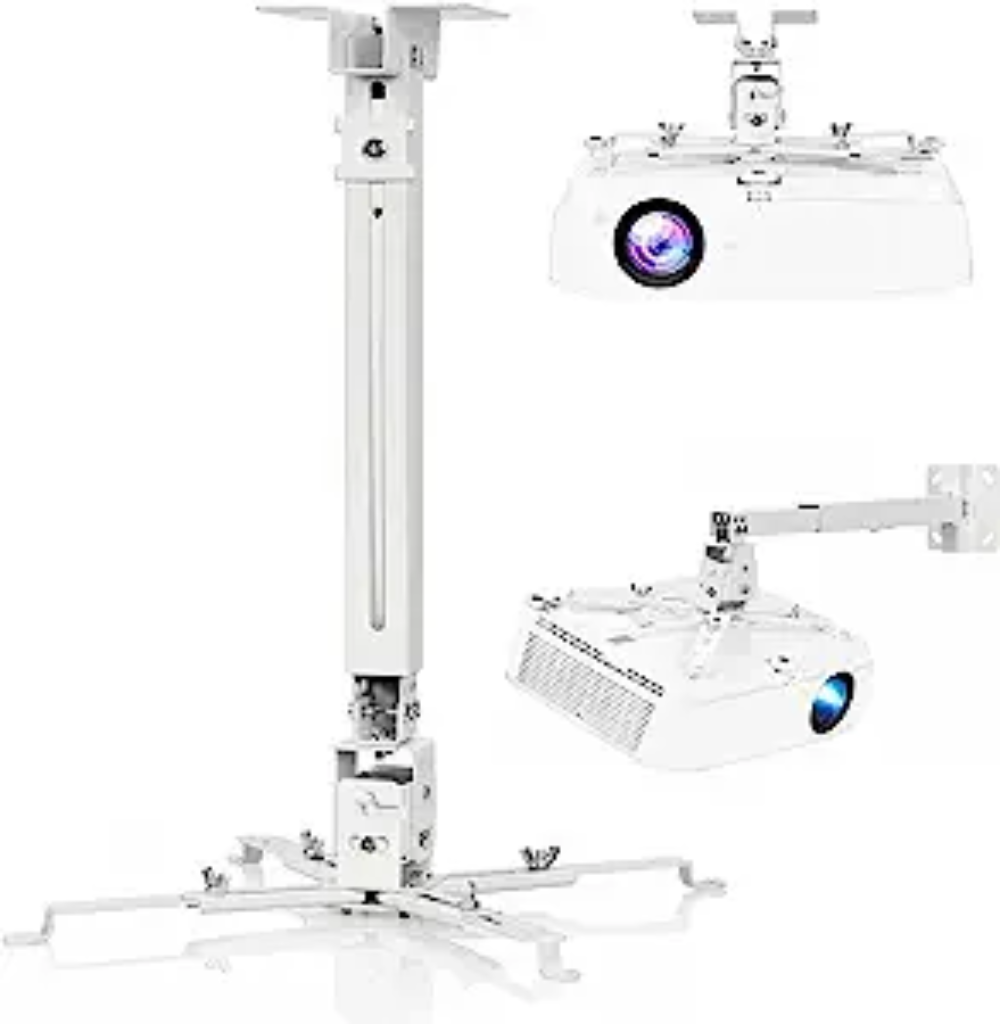
Projector Flush Mounted Into the Ceiling
Projector flush mounting into the ceiling is a great option for those looking to create a clean, minimal look. This method of projector mounting offers a discreet solution to having the equipment and projector out of sight. While also providing an even projection area across your space.
This mounting system consists of two components. A ceiling bracket or mount attached to the joists or structure in the ceiling. And a specific model-specific projector mount that connects the projector to the bracket.
When choosing this method of mounting, there are some important factors to consider. Such as the size of your ceiling; where the structural joists are located; where you want your projector mounted; if there is any kind of physical obstructions like wiring in the way; and if you’ll need extra support for additional weight.
Furthermore, for installation it’s important to have some tools handy such as; electric drill and screws, wall plugs, screws/bolts depending on which type of mount you purchase and spirit level.
The procedure for installing a projector using this method includes

- locating a suitable spot for mounting the projector – this should be between 18-24 inches from your wall or screen
- followed by securely affixing your chosen bracket into place using wall plugs and screws/bolts ensuring its level with a spirit level.
- Then carefully attach your model-specific projector mount to the bracket following any specific instructions given in the product manual
- and then fastening your projector onto it before running cables behind the unit.
- Finally double check that everything is firmly in place before powering up your equipment.
This method offers some distinct advantages. Such as aesthetically pleasing visuals as its design keeps all cabling hidden away and minimises impact on ceiling architecture or decoration.
Also there won’t be any physical interference with sound waves or anything else. While keeping power sources secure and avoiding unsafe hanging leads. Creating an ideal viewing experience!
Moreover these mounts tend to come with clever features. Like quick release clamps allowing easy removal without having to unmount from walls/ceiling. And a telescopic extension arms allowing perfect positioning according with environment dimensions.
The main disadvantage for this type of installation is the cost. It may require specialized contractors since part of installing involves working with ceilings in some cases. Whereas wall mounts offer cheaper options making them more suitable in some situations as well as not having compatibility issues. Compared with some fixed-type flush mount solutions due lack of parts availability sometimes making maintenance costly too.
Which Method is Best for You?
The best method for mounting a projector on a ceiling depends on various factors to consider when making the decision. Factors such as ceiling type, clearance and accessibility are all important when deciding which option is best. It also depends on the user’s preference and how much effort they are willing to put in to install the projector.
One popular option is using a ceiling mount that you can adjust easily. Providing better access to maintenance or installation work while allowing you to change the height of the projector without needing tools or assistance.
Ceiling mounts come with adjustable lengths, some of which can extend up to seven feet long, allowing flexibility in setting up your projector’s desired viewing distance and angle. They also make use of locking pins that keep the projector secure, as well as adjustment points to get the most out of your image.
An alternative solution would be to use recessed mounting systems.
These installations fit perfectly flush with the ceiling and require no visible parts or wires, giving them an aesthetically pleasing appearance that may be desirable in some cases.
As an added bonus, recessed mountings don’t limit the types of mounting hardware available for projectors either, giving users more options for customizing their viewing setup even further. The downside to these systems is that they may take longer to install due to needing precise measurements and wall cuts in order for them to function properly.
Ultimately, what method works best for one user might not be ideal for another depending on their own needs and desires; this makes it important for people researching mounting options to assess what they want out of their projector before they commit to a specific option.
Some people might need quick installation times over aesthetics, or vice versa. Understanding what exactly you need from your projector setup is essential before making any purchasing decisions.
In any case, spending time weighing different solutions and evaluating what works best with both current hardware limitations and individual requirements will ensure an optimal setup going forward.
In conclusion, determining the optimal method for mounting a projector on a ceiling demands careful consideration of various factors. Ceiling type, clearance, and accessibility are crucial in this decision-making process. Additionally, aligning with personal preferences can greatly impact satisfaction with the outcome. For those seeking to enhance their Spotify presence, exploring options to boost Spotify followers could be a game-changer.
Frequently Asked Questions:
Why would I want to mount a projector on a ceiling?
Ceiling mounting a projector saves space, provides an unobstructed projection area, and offers a professional and clean setup for home theaters, classrooms, and conference rooms.
What are the different methods for mounting a projector on a ceiling?
There are three primary methods: flush mount, drop pole mount, and projector mount with an adjustable arm.
What is a flush mount, and when should I use it?
A flush mount is a fixed bracket that attaches the projector directly to the ceiling. It’s ideal for rooms with a low ceiling height where minimal projection distance is needed.
What is a drop pole mount, and when is it suitable?
A drop pole mount includes a telescopic pole that extends from the ceiling to the projector. It’s used when you need to adjust the projector’s height or if the ceiling is very high.
What is a projector mount with an adjustable arm, and when should I consider it?
A projector mount with an adjustable arm allows for flexible positioning of the projector. It’s suitable when you need to fine-tune the projection angle or when dealing with uneven ceilings.
Can I mount a projector on a sloped or angled ceiling?
Yes, with an adjustable arm mount, you can compensate for sloped or angled ceilings to ensure the projector projects onto the screen correctly.